So here we are, with basic knowledge of how USB works under the hood and a strong desire to make USB work on our little STM32 chips. Time to get our hands dirty.
For the purposes of this little exposé I’m going to assume you have already created an STM32 firmware project using STM32CubeIDE (“Cube”) and that you want to add USB device capability to that project. Otherwise, you can create a dummy project with STM32CubeIDE. You’ll need to select a target microcontroller that does have a USB Full Speed device peripheral. The STM32F103 is one such microcontroller.
1. Enabling USB
The first step in using the STM32’s USB device controller is to enable it using Cube’s configuration tool. If it’s not open yet, double-click on your project’s .ioc file. You should get something that looks like this :

In the leftmost pane, expand the Connectivity category and click on USB.
In the middle pane, tick Device (FS). When you do, a new Configuration pane will appear :

You can leave all settings to those default values.
With all STM32 I’ve used so far, the USB pins can only be muxed to one pair of pins so you don’t need to look into where to mux them. On the rightmost pane they’ll be the two pins named USB_DP and USB_DM, for D+ and D-.
Next, go to the Clock Configuration tab. No matter how fast your microcontroller runs, the USB controller will always need a 48 MHz clock signal, so you need to make sure it gets that. The clock tree varies a lot from device to device so I can’t just give you a solution but here’s an example of what you should use if you’re targeting an STM32F103 running at 72 MHz from an 8 MHz crystal :

By the way, all STM32 have an internal RC oscillator for those times where your budget is so tiny you can’t even afford a quartz crystal. If you’re going to use it as your clock source, make sure it is accurate enough to meet USB requirements. Especially if your application needs to work across a wide range of temperatures.
2. Adding the USB Middleware
At this point all we’ve done is enable USB hardware inside the STM32. If you generate the project’s code right now, you will only get HAL (Hardware Abstraction Layer) library source files for that hardware, and programming the whole behavior of a USB 2.0 device will be entirely up to you. There are use cases where this may be exactly what you need… but I’m going to assume you want something higher-level.
Get back to the Pinout & Configuration tab, and expand the Middleware category. This is where ST puts all the code that can be configured and generated from their graphical tool but that isn’t directly connected to a specific peripheral.
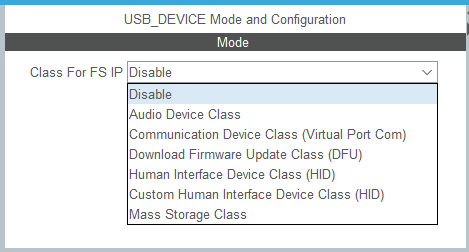
The options in that category will depend on the capabilities of your particular STM32 chip. Typically, you should at least get FATFS (which allows you to implement a FAT file system using any storage device on your STM32, for example an SD card or a QSPI Flash) and FreeRTOS (the well-known real-time operating system). Since you’ve enabled USB hardware on your MCU, you should also see a USB_DEVICE entry. Click on it. A new pane will open with a single drop-list to let you choose which class of USB device you want to generate code for :
I have every intention of trying each entry in that list before I die, so if you don’t find information here on how to use the one you’d like… well, just come here any time you think about me. Which I hope is often enough to flatter my ego but not so often that I feel creeped-out.
For the remainder of this page I will be talking about general aspects of the USB middleware which applies to all device classes. But first, one big scary warning :
DEFCON ONE – “READ OR DIE” WARNING : once you’ve chosen a device class and generated the code for your project, Cube will add all sorts of relevant source files to your project. You will need to modify some of those files to implement your application. As with every other generated source file, if you code in between the USER CODE comment blocks, your modifications will survive regenerating the code… BUT, if you change the device class or disable the middleware and then regenerate the code, your modified files will be deleted. To guard against losing precious work I suggest you try to never regenerate a project’s code. That’s often unrealistic. The next best thing is to never change the USB_DEVICE middleware settings. Also, keep current back-ups of your source files (generated or otherwise) in a separate location. Committing your work to a Git repository is also a wise move. You have been warned. Don’t come crying to me, I’m all out of tissues.
If you’re here specifically to learn how to use STM32 and follow every example you can find, this warning counts double : you will need to create separate projects for every device class you want to experiment with.
3. RTFM ? Not This Time
If your vital organs are all in their anatomically-correct places inside your body, you’ve reached the point where you should be asking where the user manual is. Here you go :
It’s a lot shorter than the USB specification, but at 60 pages it’s both long enough to require caffeine and cryptic enough to require aspirin. If it wasn’t, I wouldn’t need to write several webpages about it, now would I ? But there’s another reason I’m being so nice : that documentation, official though it may be, is official garbage. It’s almost as if they are talking of a different library but it’s not. Maybe it was written by marketing.
It’s OK if you don’t take my word on it, I really encourage you to read it if you have the time for it, but just know that it won’t really help you beyond telling you how the different pieces of the puzzle are supposed to fit together (emphasis on supposed).
Now here’s the quintessence of that manual, filtered by yours truly :
The USB device middleware we’ve enabled earlier is the STM32Cube USB device library. Henceforth referred to only as “the library”.
The library is generic, it’s the same source files no matter which STM32 microcontroller you’re using. That’s because it relies on the STM32Cube HAL (Hardware Abstraction Libraries) which encapsulate all the family-specific aspects. So that’s good news right here : once you’ve learned to use this USB library, it’ll work on any STM32. You will even be able to port code from one MCU to another.
The library’s architecture looks like this :

The orange, magenta and blue blocks are provided by ST : the orange blocks are the library we’re talking about, while the rest is part of the HAL. Upon project code generation, the source files for all those blocks will be copied to your project under a dedicated “Middlewares” folder. If you’re into “ends” rather than “means”, you’ll never open it. Those files implement standard USB protocols and STM32-specific USB peripheral control. It’s a rabbit hole you don’t want to dive into unless you have a lot of time to spare. And serious C skills.
The green block is where we’re going to be working. It’s the application-specific part of the middleware. Some of it will be generated for you (under a dedicated “USB_DEVICE” folder)… but since you’re the one writing the application, it stands to reason that you get to write the application-specific part. If you don’t, the code generated by Cube will still compile and run, but you’ll end-up with a USB device that is unconnected to the rest of your application and does nothing.
On this website, I’ll be focusing on the green block.
For starters, we’ll look at the most useful USB device class that can be implemented on an STM32 : the Communication Device Class.